Welcome back to our hiking basics series. This multi-part series was created to teach you everything you need to know to get started hiking in Israel. In the first four parts of the series, I covered the parks, the seasons, the terrain, and water in Israel. In Part Five, I’ll cover what you need to bring along for a perfect day on the trail.
The Good News
Guess what? Hiking is actually an extremely low barrier-to-entry activity. You don’t really need anything special to get out in nature and enjoy a beautiful walk on a trail. A pair of sneakers, sun protection, and sufficient water will get you through most hikes.
That said, there are lots of nice accessories which can make your hiking experience much more pleasant and enjoyable.
I’m kind of a low spender by nature. When I started Hiking the Holyland, all I had in my hiking arsenal were a couple of cheap backpacks, a pair of sneakers, and a thermos. The more I hiked, the more I added to my small collection of gear.
Let’s go through the different items you may find in my day-hiking bag on any given day. Note: This article covers day hikes only. If you’d like to learn more about packing for a multi-day trip, you can download a more complete packing list here.
How to Pick a Perfect Day Hiking Bag
Before you begin to pack that bag, you’re going to need to pick a bag. For beginners, any old backpack will do. My husband and I hiked with an oversized travel backpack for years.
But if you are planning on purchasing something well-suited to hiking there are a few key features to look for in a bag:
- Water resistance or includes a rain cover
- Comfort and support
- Chest straps
- Space for a water hydration pack
- Lots of pockets
- Bonus: Reflective strips and whistle (for emergencies)
The size of the backpack you choose will be dependent upon your preferences. If you like to pack super light (like me), you’re going to want to look for a bag that’s smaller than a standard school backpack. If you’re the type of person who always likes to be extra-prepared, get a full-sized hiking backpack, similar in volume to a large schoolbag.

I have never invested the extra cash in a fancy brand name backpack. These days, you can find generic, high-quality bags for less than $50 on Amazon.
Let’s Get Packing
Now that you’ve chosen your backpack, it’s time to fill it up. Here are the things you must bring on any hike:
- Water. The amount you need is highly dependent on the type of trail and length of the hike. For a very short hike in cool weather, a liter will do. On a challenging, half-day trail, assume at least 3 liters of liquids per person. For a full day, 5-6 is the minimum. The hotter the day, the more water you will need to bring.
- Snacks. Even a short hike is better with something to eat.
- Sunscreen and a hat. This is even more necessary in Israel, where the Mediterranean sun feels extra intense.
As far as the basics go, that’s the whole list. Now, here’s a list of other useful things you may want to bring along when you hike:
- A plastic bag for garbage.
- A pocketknife. Useful for everything from pulling splinters to cutting up fruit on the trail.
- A small package of wet wipes, tissues, or toilet paper.
- A lighter. Easy to carry and you never know when you might need it.
- A lightweight, packable raincoat. In Israel, during the rainy season only. This item is a game changer, turning otherwise un-hikeable days into perfect hiking opportunities.
- Sunglasses. Again, that Mediterranean sun.
- Bug spray. This is usually unnecessary in Israel, but so useful to have when you need it.
- Binoculars. If you like to see faraway birds up close.
- Maps/ printed hiking materials. Sometimes we carry paper maps. We also often bring along our small, laminated guides to the plants and animals in Israel.
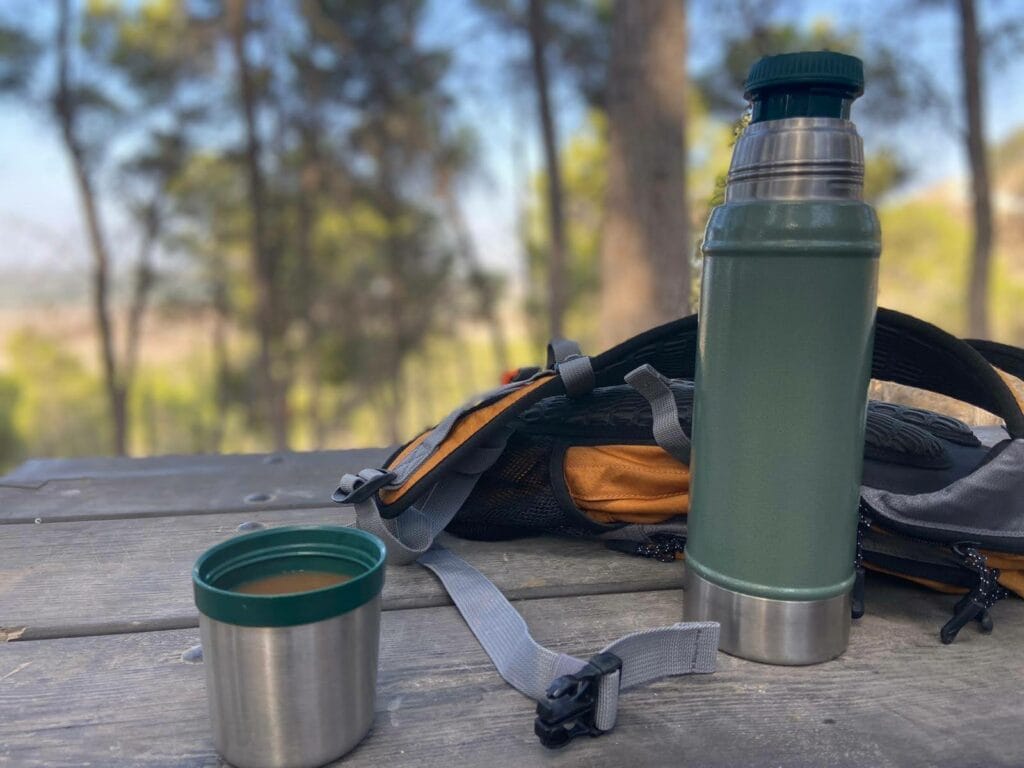
- A thermos. To me, this is one of the best additions to anyone’s hiking arsenal. Bring along a steaming hot drink in the wintertime and ice-cold coffee in the summertime. A thermos will change your entire hiking experience.
- A fold-up weatherproof blanket. This item is about the size of the palm of your hand. It can be useful to lay down on the wet ground for a picnic.
- Winter extras. If you’re hiking on a rainy day in the wintertime, extra socks and instant handwarmers are a good addition to your bag.
- A small first-aid kit.
- Fold up hiking poles. I do not use these, but anyone who has will swear by them. They are said to provide extra stability and make hiking easier on the knees.
- A camera. Phone camera works fine too.
- Headlamps or flashlights. Essential on cave hikes and sunset hikes.
- A real meal. Snacks are nice, but any hike is better with a proper meal. Put together a fancy sandwich and enhance your hiking experience.
A Note on Footwear
Of course, footwear doesn’t go in your backpack. But you still need to know how to choose the right hiking shoes for the occasion. For beginners, there are three useful types of hiking footwear to own. I know this is a lot, and a good pair of sneakers is all you really need. But if you have these three pairs of shoes, you’ll be better prepared for every situation:
- Waterproof hiking boots. It can be rainy or muddy along the trail. In the wintertime, you may even find that you have small rivulets to cross. Waterproof hiking boots will make your winter hiking experience a thousand times more pleasant. As opposed to regular rain boots, hiking boots have a lot of extra traction on the bottom to prevent slippage. The trails in Israel are not flat. Good treads will make you feel much safer as you hike up and down on rocky, wet areas.
- Good sneakers or hiking shoes (non-waterproof). It doesn’t rain in Israel in the summertime. You don’t need to lug around a heavy pair of non-breathable waterproof hiking boots on warm-weather hikes. Invest in a pair of sneakers or hiking shoes with excellent grips on the soles. This will help you stay secure on Israel’s rocky trails.
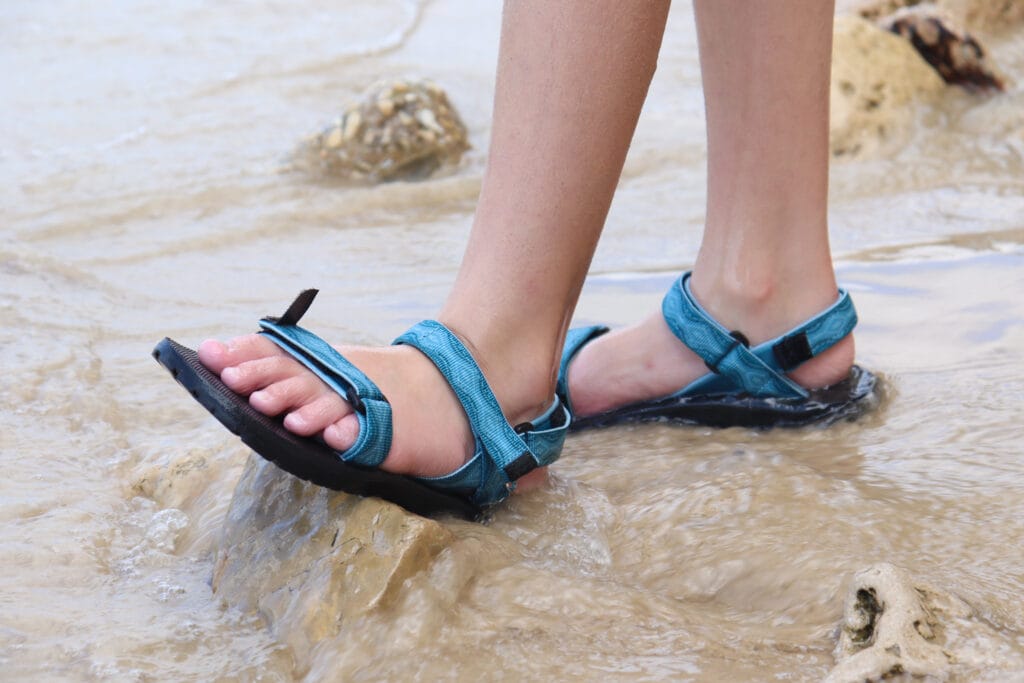
- Water hiking shoes. Having a good pair of water hiking shoes will change your warm-weather hiking experience. At Ein Gedi, Nahal Kziv, Nahal Snir, and in hundreds of other places, these shoes will allow you to walk in and out of the water safely, protecting your feet and keeping you comfortable. Read a full article on water shoes here.
How to Carry Your Water
In the hiking community, there’s a big debate as to what type of water storage is best. Should you carry your water in bottles or in an easily accessible hydration bag (a soft thermoplastic bag with a long straw spout that sits in the back of your backpack)?
Water bottle advocates say that hydration bags can leak, leaving you water-less. I have been hiking for decades and this has never happened to me. I have had leaky spouts and the like, but these minor mishaps have been infrequent and not severe enough to cause total water loss.
Water bottles have the advantage of being solid and easy to fill. Also, if you use a thermos bottle, you can keep iced water freezing cold for many hours.
Hydration bag advocates love the constant availability of water that comes with a hydration system. As you hike, the straw near your chin reminds you to keep drinking. During the hard parts of a hike, you don’t have to stop to take out your water bottle.

There are pros and cons to each water-carrying system. My preference is to take along both types. I use the hydration bag to sip while I walk and the bottle when I stop for a break. It’s the best of all worlds.
Note: You can find quality thermos bottles and hydration backpacks in our online shop.
What About with Kids?
Hiking with kids takes your packing needs to a whole new level. Everyone needs food, everyone needs water, and suddenly, the first-aid kit, wet wipes, and binoculars seem more like necessities than optional equipment.
Usually, hiking with kids means bringing a bigger bag. And if you’re carrying a small child in a backpack, you’ll need to find someone else to carry all the gear.
But if you have any older kids (6 and up), they can carry their own hiking packs. I like to equip each of my children with a small hydration backpack whenever possible. These bags also have pockets for sandwiches and rock collections. If the hike is short, I may only fill the hydration pack up halfway to reduce the weight.
Whomever carries the gear, here is a list of “non-essential” items we always bring when hiking with our kids in Israel:
- Tissues and wipes, along with extra disposable bags.
- Extra food and treats. These are great ways to motivate your kids along the trail.
- A pen. Useful for filling out Junior Ranger booklets at National Parks.
- Laminated guides to plants and animals in Israel.
- First aid supplies. Band-aids make everything better.

A Note on Apparel
No discussion of hiking prep would be complete without discussing apparel. Again, as a beginner, you need no special apparel to go hiking. Once you become a more frequent hiker, use this list to help you build your hiking wardrobe:
- Lightweight hiking pants. These specialty pants are water resistant and quick to dry. They’ll protect your legs from run-ins with thorns and shield your knees as you crawl through a cave.
- Hiking socks. You can make do with regular socks for short hikes, but for longer trails, hiking socks will keep your feet comfortable and blister free.
- Wool t-shirts or hiking shirts. There’s nothing worse than sitting in a pool of sweat, especially on a cold day. Wool t-shirts wick the sweat away and leave you odor free. Hiking shirts allow sweat to evaporate, dry fast, and protect you from the sun.
Don’t be Daunted!
Most importantly, don’t be daunted! Remember, all you really need to go hiking is a pair of sneakers, some water, and sun protection. Gear is helpful, but you can experience the beauty of Israel’s great outdoors without any fancy accessories. Instead of stressing, use this guide to help you slowly build your hiking arsenal.
I hope this complete guide to packing for a day hike was helpful. Stay tuned for Part Six of this Hiking Basics series, where I’ll explain the different trail markers in Israel and what they all mean.