| Trail Map | ||
| Distance: 14.5km | Time: 6- 7 hours | Difficulty: Strenuous |
| Ascent: 698m |
Click here to go straight to hike notes.
Last Sunday, I began following a dream.
For years, I’ve been pining away after the Israel Trail. As a busy mother of six, I’ve thought of every possible permutation of how I could possibly hike this 1000+ kilometer trail from Northern to Southern Israel.
I’ve thought of taking my kids out of school for months at a time and hiking it together as a family. I’ve thought of taking just one child and tackling 5 days of the trail at a time, once a month. And I’ve considered simply waiting until my kids are grown. Then, maybe my husband and I would head out for two straight months of hiking.
It wasn’t until recently that a whole new idea emerged: perhaps I could hike the trail r-e-a-l-l-y s-l-o-w-l-y, one segment at a time, on a once-a-month group hike. True, it was no massive thru-hiking adventure. But hiking the trail this way, I would still get a real feeling for the breadth and scope of the land of Israel. Being imaginative by nature, I knew I would be able to keep last month’s segment in my mind as I began each new one. Although not connected by time, all of the pieces would be connected in my memory, forming one long, incredible journey.

So that’s what I decided to do. This month, after much planning, arranging, and rescheduling, we began the first section of the Israel Trail, from Tel Hai to Nekikei Yiftach. It was only 14 kilometers long, but between the long drive up North and back home, the outing took up the entire day.
The day was incredible.
It was incredible to set out on such a massive journey, knowing that it would take about 6 years before reaching the end. The hike itself was beautiful. Perhaps it was even more so because we hiked during flower season, when the landscape is at its absolute best. Not only that, but hiking it with a group meant that we had a guide to share the trail’s rich history as we traveled. I can’t think of a better way to learn about the history and terrain of the land of Israel.
Here’s how we hiked the first segment of the Israel Trail, from Tel Hai to Nekikei Yiftach:
The Roaring Lion
We began the day at Tel Hai, the small community with an important history. It was here that 8 people were murdered by Arabs in March 1920, as they attempted to secure this part of the Galilee. The death of these 8 gave Kiryat Shmona its name. Amongst the fallen was Joseph Trumpledor, founder of the Zion Mule Corps. His last words were said to be “It is good to die for one’s country.”
With this powerful beginning, we found the start of the Israel Trail across the parking lot and began our descent along a narrow pathway.

The walk began through a forested area, past red anemones, yellow mustard blossoms, and light pink cyclamen aplenty. It was a gorgeous day – cool and clear – and we were all in good spirits. Before too long, the path widened up, and we walked together along a pleasant pathway between the trees.
Taking in the Scenery
Perhaps the most special part about this segment of the Israel Trail were the views. As we ascended, we began to see the Upper Galilee stretched out before us. Clouds hung low, crowning Mount Hermon in the distance.
We could see Hula Valley, a once swampy area now rehabilitated and beautiful. Millions of migratory birds pass through at Hula Lake each year, and some have now made the natural area their home.

Since we were headed uphill, we stopped for a few breaks to catch our breath and got some explanations along the way. Then, we continued through a dark and deep forest, rich with greenery and wildflowers. I was excited to see pink and purple anemone flowers, rarely seen in the southern part of Israel.
All About that Break
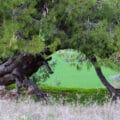
We walked for a while more, then broke off the pathway towards a picture-perfect lookout for a lunch break. Here, there were large flat rocks to sit on, and an incredible, panoramic view to take in. After distributing hot tea and energy bites amongst the rest of the hikers, I sat on my own flat rock and enjoyed the nature all around.

It was simply beautiful there. I especially liked how we had emerged from the trees towards this cluster of rocks, which overlooked a settled land of Israel. Yes, we could see Mount Hermon looming in the distance. But we could also see cities and farmland, along with nature reserves and a lake. It was a perfect place to contemplate nature over a hot cup of coffee.
After everyone was thoroughly rested and refreshed, we packed up and continued on our journey.
Onward!
Next, the trail took us along a wide, flat path, mostly exposed to the sun. (But luckily for us, it was overcast that day). And we were still going uphill. I was thankful for the cloud cover as we walked along, past tall Irit flowers clustered together and more anemones. We worked our way uphill at an easy pace, passing a few stray cows on the sides of the path.
Finally, we reached a turning point. Here, a thick grove of almond trees blossomed in shades of light pink and white. The trail took a sharp turn downward. We decided to stop here for another break before continuing on our journey.

We learned about the community of Yiftach, named for the Yiftach brigade soldiers who established the kibbutz. Our guide, Ben, also told us a bit about the geography, and the Syrian African rift line which separated the Galilee from the Golan Heights. Once the area was a continuous mountain range. Now the Hula Valley and the Sea of Galilee sit in between the two geographical areas.
Of course, I also had to stop to take a lot of pictures. Between the views and the almond blossoms, I couldn’t think of a better place to take some close ups of our hikers that day. I snapped away while everyone relaxed and chatted. Then, we took the turn and headed downhill.

Almost There
We weren’t too far away now – just 2 ½ kilometers from the end. The sun descended in the sky as we walked along another wide pathway, this one sprinkled with little white petals.
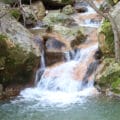
After a long walk, we broke off onto the blue trail, signifying that our journey was almost at an end. We reached Nekikei Yiftach, a playground of large, grey rocks in the shade. This looked like a haphazard series of boulders, but in reality, Nekikei Yiftach was the remains of a collapsed cave. This spot was fun to climb over and around, our last big adventure before reaching the end of the trail.
We finished up at Nekikei Yiftach and made our way to the parking lot, for a celebratory toast over red wine, cheese, and crackers. It had been an amazing day.
Beginning with this 14 kilometer hike, I couldn’t help but look forward to the rest of our long walk from the north of Israel to the very south. Between the beauty, the history, and geography, this first stretch of the Israel Trail was a great start to an amazing journey.


Hikers’ Notes:
Here’s what you need to know to hike the first section of the Israel Trail:
- This trail can be hiked year round, but is best suited to the fall, winter, and spring seasons.
- Suitable for dogs.
- When you finish the hike, you can call a taxi from Kiryat Shmona for transport back to the trailhead. This costs about 130 NIS.
- Wear good hiking shoes and a hat, and bring plenty of water to hike this trail.
- The Israel Trail is well marked the whole way through. Follow the Israel Trail markers until you reach Nekikei Yiftach towards the end. From here, take the blue trail to get to the parking lot at the end.
Don’t forget to read my guide to the navigational features in this post before you hit the trail!
Trail map from Amud Anan.
Questions? Have you hiked this part of the Israel Trail? Let’s hear about it in the comments!